Sitecore Marketplace Apps: Custom Authorization Setup
If your Sitecore Marketplace app needs to make server-side API calls to SitecoreAI APIs (e.g., AI agents, agentic workflows) or you want to protect it with Sitecore authentication, you need a full-stack app with custom authorization.
This guide walks through the complete setup, based on the official Sitecore documentation and a working implementation in marketers-chat.
1. Scaffold the app
Pick the right template:
- Full-stack + custom auth:
npx shadcn@latest add https://blok.sitecore.com/r/marketplace/next/quickstart-with-custom-auth.json - Full-stack + custom auth + XMC package:
npx shadcn@latest add https://blok.sitecore.com/r/marketplace/next/quickstart-with-full-stack-xmc.json
When prompted: select Yes for Next.js, Neutral for base color.
2. Set up custom DNS
Auth0 treats localhost as a third-party origin, which can cause unexpected behavior with consent dialogs, silent token refresh, and cookies. A custom DNS ensures your local environment behaves consistently with production.
Windows — open PowerShell as admin:
code C:\Windows\System32\drivers\etc\hostsAdd this line:
127.0.0.1 myapp.localmacOS:
sudo sh -c 'echo "127.0.0.1 myapp.local" >> /etc/hosts'3. Generate local HTTPS certificates with mkcert
Auth0 requires HTTPS. Use mkcert to generate locally-trusted certificates:
# Install mkcert (if not installed)
# Windows (via Chocolatey):
choco install mkcert
# macOS:
brew install mkcert

# Install local CA
mkcert -install

# Generate certs for your custom domain
mkdir certificates
mkcert -key-file ./certificates/myapp.local-key.pem -cert-file ./certificates/myapp.local.pem myapp.local
4. Create client credentials
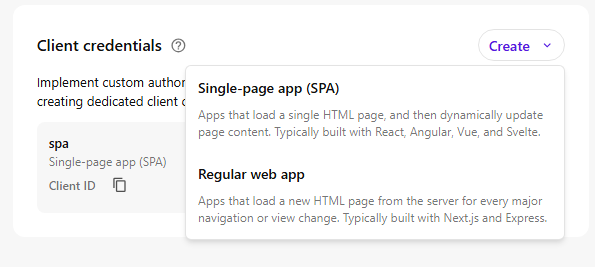
In the Sitecore Cloud Portal, navigate to your app’s Client credentials section and click Create.
Select “Single-page app (SPA)” as the application type — even for full-stack Next.js apps, because the SDK quick start templates use @auth0/auth0-react for client-side authentication.
Fill in the credential details:
- Alias: give your credentials a name (e.g.,
spa) - Allowed callback URLs:
https://myapp.local:3000 - Allowed logout URLs:
https://myapp.local:3000 - Allowed origins URLs:
https://myapp.local:3000 - Allowed web origins URLs:
https://myapp.local:3000
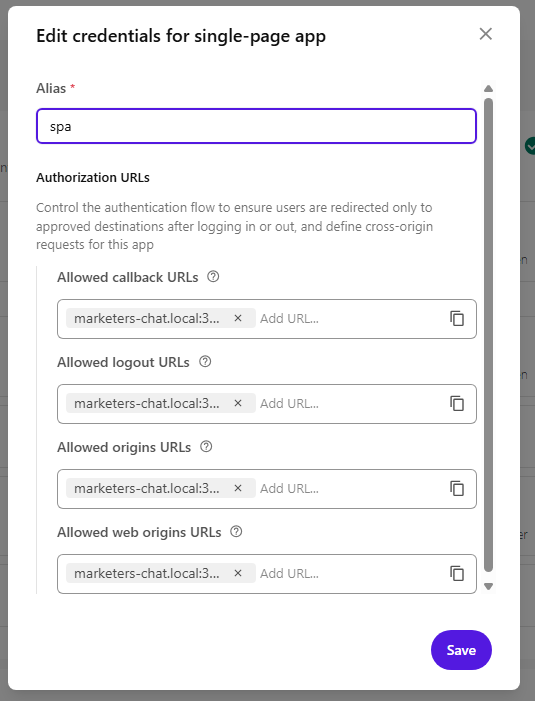
After saving, copy the Client ID — you’ll need it in the next step.
5. Configure the app
In .env.local, set:
# Auth0 domain for Sitecore Cloud authentication
NEXT_PUBLIC_AUTH0_DOMAIN=https://auth.sitecorecloud.io
# API audience for Sitecore Cloud API access
NEXT_PUBLIC_AUTH0_AUDIENCE=https://api-webapp.sitecorecloud.io
# OAuth scopes: offline_access enables token refresh
NEXT_PUBLIC_AUTH0_SCOPE=openid profile email offline_access
# Your app ID from the Marketplace portal
NEXT_PUBLIC_SITECORE_APP_ID=<your-marketplace-app-id>
# Client ID from the SPA credentials you created in step 4
NEXT_PUBLIC_AUTH0_CLIENT_ID=<your-spa-client-id>
# Must match the Deployment URL and custom DNS from step 2
NEXT_PUBLIC_APP_BASE_URL=https://myapp.local:3000
In package.json, update the dev script to use HTTPS with your certificates:
"dev": "next dev --hostname myapp.local --experimental-https --experimental-https-key ./certificates/myapp.local-key.pem --experimental-https-cert ./certificates/myapp.local.pem"6. Auth provider setup
The scaffolded app includes an Auth0 provider that wires up authorization with Sitecore’s organization and tenant context. The key part is the AuthProvider component that configures Auth0Provider with the right parameters:
const authParams = {
  organization_id: appContext.organizationId,
  tenant_id: appContext['marketplaceAppTenantId'],
  product_codes: `mkp_${process.env.NEXT_PUBLIC_SITECORE_APP_ID}`,
  audience: process.env.NEXT_PUBLIC_AUTH0_AUDIENCE,
  redirect_uri: process.env.NEXT_PUBLIC_APP_BASE_URL + `/?redirect=${window.location.pathname}`,
  scope: process.env.NEXT_PUBLIC_AUTH0_SCOPE,
};
Note the redirect_uri — it points to the root page with a ?redirect= query param capturing the current path. Auth0 requires redirect_uri to match one of the Allowed callback URLs in your client credentials. Instead of registering every route, you register just the root (https://myapp.local:3000) and the root page.tsx handles the bounce:
// app/page.tsx
export default async function Page({ searchParams }) {
  const { redirect: target } = await searchParams;
  if (target) redirect(target);
  return <div />;
}
After Auth0 authentication, the user lands on /?redirect=/chat and gets immediately redirected back to /chat (or wherever they were). Full implementation: app/page.tsx
A custom useAuth() hook ensures every getAccessTokenSilently() call includes organization_id and tenant_id, so tokens are scoped correctly.
For server-side API calls, the client retrieves the token and passes it via the Authorization header:
const accessToken = await getAccessTokenSilently();
headers['Authorization'] = `Bearer ${accessToken}`;
The API route then uses this token to create an authenticated XMC client:
const client = await experimental_createXMCClient({
  getAccessToken: async () => accessToken,
});
Full implementation: components/providers/auth.tsx, lib/hooks/use-chat-bot.ts, app/api/editors-agent/route.ts
7. Run & open in Sitecore
npm run devOpen your app in the Cloud Portal via its extension point. The app will only work inside the Sitecore iframe — standalone access at https://myapp.local:3000 won’t have the Sitecore application context.
Note: The SDK templates use @auth0/auth0-react for client-side authentication. If you prefer server-side auth patterns with @auth0/nextjs-auth0, you can swap the package and adapt the implementation — the Marketplace SDK doesn’t constrain which Auth0 library you use.
View article as markdown